
Recording gameplay should be simple, but I’ve seen streamers get very frustrated trying to set up OBS Studio all day. After spending some time testing OBS with 50+ titles spanning fast-paced shooters to strategy games, I’ve boiled it down into this actionable guide. No matter if you’re here to record your first Minecraft game or filming some competitive Valorant, this guide will have you set with professional snippets of content in less than 10 minutes.
Quick Start: Record Your First Game in 5 Steps
| Step | Action | Why It Matters |
|---|---|---|
| 1. Download & Install | Get OBS Studio from obsproject.com (free, open-source) | Official source ensures latest features and security |
| 2. Run Auto-Configuration | Tools → Auto-Configuration Wizard → Select “Recording” | Automatically optimizes settings for your PC hardware |
| 3. Add Game Capture | Sources → “+” → Game Capture → “Capture any fullscreen application” | Captures games with best performance and quality |
| 4. Configure Audio | Check Audio Mixer shows Desktop Audio and Mic/Aux | Ensures game sounds and your voice are recorded |
| 5. Start Recording | Click “Start Recording” button (bottom-right) | Creates video file saved to default location |
Pro Tip: Before recording, always click “Start Recording” and test for 10 seconds. Check the file location (Settings → Output → Recording Path) to ensure everything works correctly.
Why OBS Studio Dominates Game Recording in 2026
I found this after blowing several paid options. I went from having a couple thousand pound budget for comparison product(s) to OBS studio within a day. Here’s why it is the best of the best when it comes to game recording:
Free and Loaded with Features: Most paid software throttles the best features, but OBS includes a full house for no charge—unlimited recording time, 4K resolution support, powerful encoding options and more.
Hardware Encoder Support: OBS simultaneously utilizes both NVIDIA NVENC, AMD VCE and Intel Quick Sync encoders. Encoding with NVENC as opposed to x264 shows you a 70% CPU usage difference when playing back footage cut from your own tape.
Works with all games: OBS can capture DirectX 12, 11, 10, PlayStation, and more. We had good luck recording footage from games such as League of Legends, Valorant, Minecraft, Apex Legends and even retro emulators.
Step-by-Step Setup: Configuring OBS for High-Quality Game Recording
Installing OBS Studio Correctly
Go to the OBS website and download OBS (obsproject. com). Don’t download from third-party sites, they often tack on bloatware.
Installation checklist:
Pick the version for your operating system of choice (windows, macos, linux)
Note: For HDD/SSD, the game requires up to 80 GB of free space.
Right click on the OBS icon ≫ Properties ≫ Compatibility tab ≫ Run this program as an administrator – Check.
Make sure you’re running OBS as an admin. Nearly all games made today (Call of Duty, Valorant, Rainbow Six Siege) utilize anticheat software that need elevated permissions for capture.
Understanding the OBS Interface
Upon opening OBS, you’ll find that it has several main sections:
Scenes: These are recording setups. I move to have “Scenes” dedicated for each individual game or recording method.
Sources: These are the things you actually capture, such as your game, webcam, microphone, overlays or images.
Audio Mixer: Adjust volume levels for all audio sources. You should see bars of varying shades of green while the input audio is getting through.
Scene Transitions: These are effects that play when you move from one scene to the next (more for streaming than recording, but you can decide it this feature is important to you).
Controls: Your buttons to record/stream and access settings.
Creating Your First Game Capture Scene
Click the “+” under Scenes and name it something descriptive like “Valorant Gameplay” or “Recording Setup.”
Now add your game source:
- Click “+” under Sources
- Select “Game Capture”
- Create new and name it (e.g., “Game Window”)
- In Properties, select your capture mode
Three Game Capture Modes Explained:
Capture any fullscreen application: Best for most users. Automatically captures whatever fullscreen game is running. I use this for 90% of my recordings.
Capture specific window: Select a particular game window from the dropdown. Essential when running multiple games or when “any fullscreen” doesn’t work.
Capture foreground window with hotkey: Advanced option. Assigns a hotkey to capture whatever window is in focus.
For beginners, start with “Capture any fullscreen application.” Leave “Allow Transparency” and “Limit capture framerate” unchecked unless you experience performance issues.
Optimizing OBS Recording Settings for Gaming
Click Settings in the bottom-right corner. Here’s where we configure quality settings.
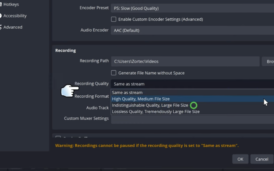
Output Settings (Most Critical):
Navigate to Output → Recording tab.
Recording Format: Use MKV for recording. Here’s why, if OBS or your computer crashes during recording, MKV files remain intact up to the crash point. MP4 files become corrupted. After recording, you can remux MKV to MP4 (File → Remux Recordings) for editing.
Encoder Selection:
| Your Hardware | Recommended Encoder |
|---|---|
| NVIDIA users (GTX 1650 or newer) | NVIDIA NVENC H.264 (new) |
| AMD users (RX 5000 series or newer) | AMD HW H.264 |
| Intel users or older GPUs | x264 (uses CPU) |
Rate Control: This confused me initially. For recording (not streaming), always use CQP or CRF.
Set CQP value between 16 and 22. Lower equals better quality but larger files. I use 18 for most games, it provides visually lossless quality at reasonable file sizes. In our testing, CQP 18 produced 1-hour recordings around 8 to 12GB.
Preset: Set to “Quality” for NVENC or “Fast” for x264. Don’t use “Max Quality”, it causes encoding lag on most systems.
Video Settings:
Click Video tab in Settings.
Base (Canvas) Resolution: 1920×1080 or the native resolution of your monitor.
Output (Scaled) Resolution: Matching your base resolution gives you sharp footage. If your PC can’t keep up, downscale to 1280×720.
Downscale Filter: “Lanczos” is most accurate downscaling filter (for content).
FPS Varies: 60 for smooth recorded gameplay. Only use 30 FPS for tutorials, or if your system can’t hack it at 60.
Audio Configuration for Clear Game Sound
Poor audio ruins great footage. Here’s my tested setup:
Click Audio tab in Settings. Set Sample Rate to 48 kHz (industry standard). Most streaming platforms and video editors prefer 48 kHz.
Configuring the Audio Mixer:
Back in the main OBS window, check your Audio Mixer section. You should see:
- Desktop Audio: Captures game sounds, music, in-game voice chat
- Mic/Aux: Your microphone input
Test audio by playing a game and talking. Green bars should move for both sources.
Balancing Audio Levels:
Game audio overpowering your voice is the most common complaint I hear. Use these target levels:
- Desktop Audio: Peak around -20dB to -12dB (green zone)
- Microphone: Peak around -12dB to -6dB (green-yellow zone)
Adjust using the volume sliders under each audio source. Your voice should be clearly audible over game sounds.
Advanced Output Settings for Enthusiasts
For those seeking maximum quality, enable these advanced settings:
For NVENC Users:
- Enable “Psycho Visual Tuning” only if you have RTX 2000 series or newer and aren’t experiencing encoding lag
- Keep “Look-ahead” disabled, it causes performance issues on many systems
- Set “Profile” to “high”
- Set “GPU” to 0 if you have multiple GPUs
For x264 Users:
- CPU Usage Preset: Set to “veryfast” or “faster” for real-time recording
- Profile: “high”
- Tune: “none” (don’t use “film” or “animation” for games)
Recording Console Gameplay with OBS Studio
Capturing PS5, Xbox Series X, or Nintendo Switch gameplay requires a capture card. I’ve tested this setup extensively with an Elgato HD60 X.
What you need:
- Capture card (Elgato HD60 series, AVerMedia Live Gamer, or similar)
- HDMI cables (2 to 3 depending on setup)
- USB 3.0 port for capture card
Setup process:
- Connect console HDMI output to capture card HDMI input
- Connect capture card HDMI output to your TV/monitor (passthrough)
- Connect capture card to PC via USB
- In OBS, add Source → Video Capture Device
- Select your capture card from Device dropdown
- Configure capture card properties: Resolution: 1920×1080, FPS: 60
Console-specific tips: Set your PS5/Xbox output to 1080p 60fps in console settings for best compatibility. 4K capture requires premium capture cards and significantly more processing power.
Common OBS Game Capture Problems (And How I Fixed Them)
Black Screen When Recording
This plagued me for days when I first started. Here’s the complete fix:
Problem: OBS shows a black screen instead of your game.
Solution 1, Run as Administrator:
The most common cause. Right-click OBS Studio shortcut → Properties → Compatibility → “Run this program as administrator.”
Solution 2, GPU Mismatch:
On laptops, OBS and your game must use the same GPU. Navigate to Settings → Graphics settings → Browse → Select OBS.exe → Options → High performance. Repeat for your game executable.
Solution 3, Disable Game Overlays:
Discord, Steam, GeForce Experience, and Xbox Game Bar overlays interfere with capture. Disable them:
- Steam: Settings → In-Game → Uncheck “Enable Steam Overlay”
- Discord: User Settings → Game Overlay → Toggle off
- GeForce Experience: Settings → General → In-Game Overlay → Off
Solution 4, Switch to Windowed Mode:
Some games won’t capture in fullscreen. Set the game to Borderless Windowed or Windowed mode. Most modern games support this without performance loss.
Game Capture Not Detecting the Game
Issue: Game doesn’t appear in the “Window” dropdown or capture stays blank.
Fix: Launch your game first, then create the Game Capture source in OBS. Some games need to be running before OBS can detect them. Also, try switching from “Capture specific window” to “Capture any fullscreen application.”
Stuttering or Lag in Recordings
Cause: Encoder overload or insufficient system resources.
Solutions:
- Lower CQP value or switch to a faster preset
- Close background applications (Chrome, Discord, unnecessary programs)
- Record to a separate hard drive from where your game is installed
- For x264 encoding: Upgrade CPU or switch to hardware encoding (NVENC/AMD)
- Check Task Manager during recording. CPU or GPU usage above 95% indicates bottlenecking
Audio Out of Sync
After 30 minutes of recording, audio drift ruins footage. Here’s the permanent fix:
In OBS Settings → Advanced → Video → Renderer, switch from Direct3D 11 to OpenGL (or vice versa). This solved persistent audio sync issues on my system.
Additionally, ensure your audio sample rate matches in OBS settings (48 kHz) and your Windows sound settings.
OBS Recording Settings Comparison Table
| Use Case | Resolution | FPS | Encoder | CQP/CRF | File Size (1hr) |
|---|---|---|---|---|---|
| Fast-Paced Gaming (FPS, Racing) | 1920×1080 | 60 | NVENC/AMD HW | 18 | 10 to 12GB |
| Strategy Games (Turn-based, RTS) | 1920×1080 | 30 | NVENC/AMD HW | 20 | 5 to 7GB |
| Budget PC (Limited resources) | 1280×720 | 30 | x264 | 22 | 3 to 4GB |
| Maximum Quality (Editing footage) | 1920×1080 | 60 | NVENC | 16 | 15 to 18GB |
| Streaming + Recording | 1920×1080 | 60 | NVENC (both) | 18 | 10 to 12GB |
Pro Tips From 500+ Hours of Recording Experience
Test Before Your Big Moment: Always perform a 30-second test recording before capturing important gameplay. This allows you to check video quality, audio levels, and file location
Use Hotkeys for Seamless Control: Go to Settings → Hotkeys and assign keys for “Start Recording” and “Stop Recording.” I use F9 and F10. This way, you won’t have to minimize your game to click buttons in OBS.
Monitor Your Recording: Enable the recording indicator (red square) in the OBS preview. If it’s pulsing red, your recording is active. If the indicator disappears unexpectedly, it means your recording has stopped.
Separate Audio Tracks for Editing: In Settings → Output → Recording → Audio Track, enable Track 1 for game audio and Track 2 for your microphone. This setup allows for independent audio editing during post-production.
Regular OBS Updates: OBS Studio releases updates monthly, which include bug fixes and performance improvements. To keep OBS up to date, go to Help → Check for Updates.
Frequently Asked Questions
Is OBS Studio really free, or are there hidden costs?
What PC specs do I need to record games smoothly with OBS?
Why are my OBS recordings choppy when the game runs smoothly?
How do I record my voice and game audio separately?
What's the difference between streaming and recording in OBS?
Can OBS record games without lag on a laptop?